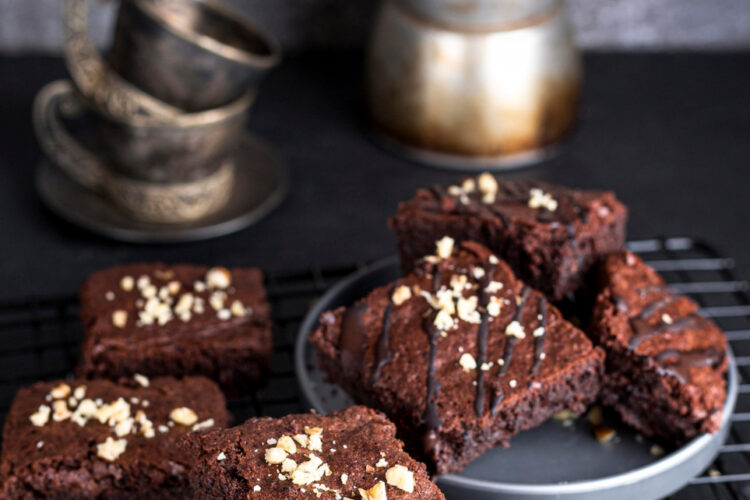
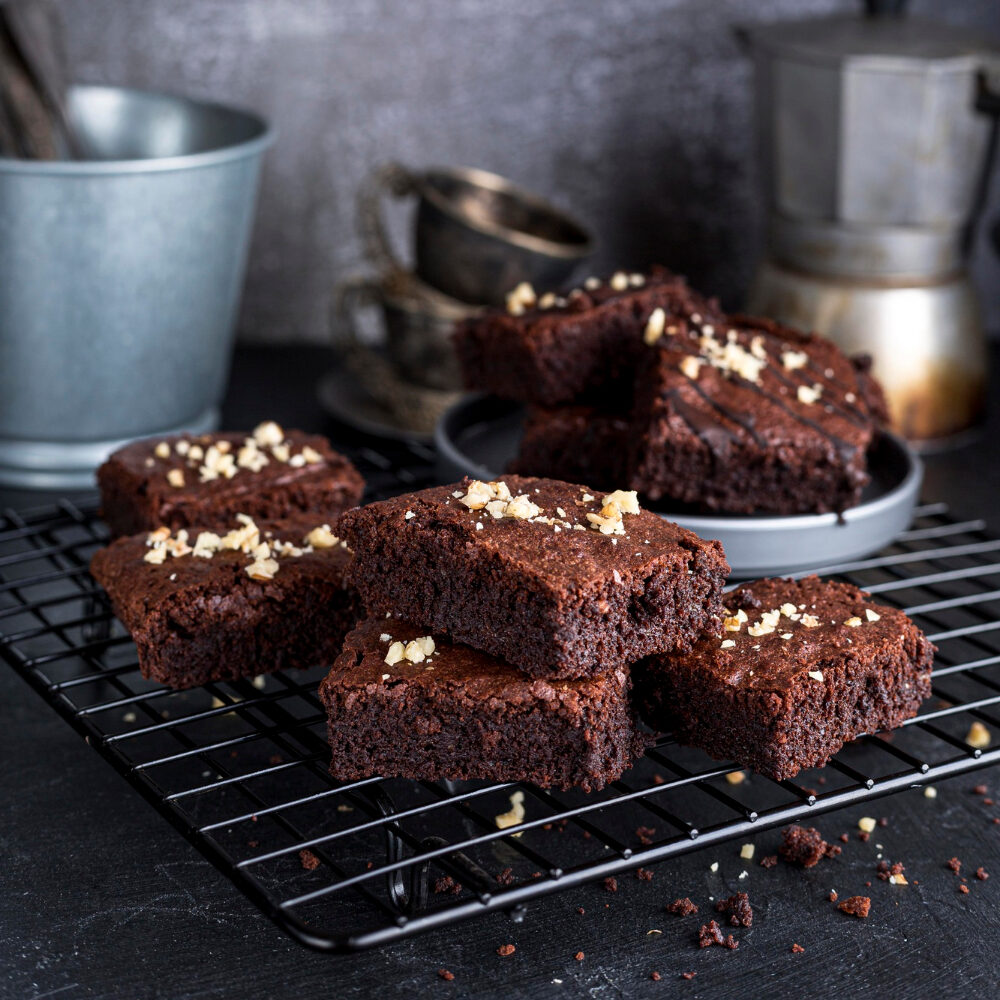
Fudgy, rich and naturally gluten-free these brownies are a chocolate lover’s dream! Easy to make and delicious.
Jump to Recipe Print RecipeYou would never think these gluten-free brownies are missing anything because they are so dense fudgy and scrumptious! In every bite, there are melted chocolate pockets and a shiny top crowns the brownie. This brownie is like boxed mix brownies but better. Plus, this recipe can easily adapt to normal or dairy-free ingredients.
Why do people call this the BEST gluten-free brownie recipe?
This recipe is perfect and effortless as it consists of all the necessary elements. I have tried many types of gluten-free flours and sets of recipes in order to find the most suitable, while being easily available to most people. The aim was to keep it straight-forward and self-sufficient, without compromising on the quality of ingredients.
Here’s what I tested: one-for-one gluten-free baking flour, almond flour, rice flour, cassava flour and buckwheat flour. Instead of achieving the intended taste each option provided a gritty texture. Hence, I decided to use starches. The outcome was exceptional. Using tapioca flour resulted in the best texture.
Tapioca flour has a grainy texture and is extremely fine similar to cornstarch. Also, it is a natural thickening agent which assists the binding in brownies during their baking process. The addition of melted butter, oil, dark chocolate and cocoa powder results in rich fudge-like brownies that immediately melt in your mouth upon consumption. They are comparably more flavorful and fudgier than boxed brownies.
Tips for baking gluten free brownies
1. Butter
Firstly, put the butter in a pot on the stove until it melts. Make sure to watch the temperature because too much evaporation will give you lesser butter than desired.
2. Sugar & Eggs
You should not overlook the importance of mixing the sugar and eggs thoroughly. I recommend for you mix them for a minimum of one minute. This will give the brownie’s a thin crust surface layer. When the mixture is pale yellow and creamy, you’ll know you’ve got it right
3. Salt
For this particular recipe, I use coarse kosher salt. If table salt is what you have, use half as much fine as the recipe asks for.
4. Baking Pan
Use a light colored metal square baking pan for the best results. Rather this shape of pan aids during heating brown bread.
5. Lining the Pan
Firstly grease the baking pan afterwards put the parchment paper inside and grease it again. The recipe contains some starch which could make brownie sticking problem so this additional greasing helps in removing them easily after baking.
With these five tips in mind, it is very easy to follow the recipe. It will be pretty difficult to screw up these brownies because the tapioca flour is forgiving. Regardless of the effort put into the preparation, every single time you will get rich and fudgy gluten-free brownies.
These are definitely dream come true brownies for anyone in need of or who just loves gluten-free treats. Rich, fudgy and simple to prepare they can satisfy everything from everyday snacks to special occasions. So whether you strictly follow a gluten-free diet or just want to try something new, this recipe is bound to be a success.
Frequently Asked Questions
Is it possible to use cornstarch in the place of tapioca flour?
Certainly, if you are following the mentioned recipe, you can substitute tapioca flour with cornstarch because their functioning is almost alike.
How can you make gluten-free brownies without dairy?
That is quite easy! Simply put dairy-free chocolate along with plant-based butter. Trust me, I have tried both (ones with dairy and others without), and the taste is the same.
It is possible to make these brownies vegan?
I have not yet adopted egg substitutes, however, if you are willing to experiment, you can swap eggs with two flax eggs. To create flax eggs, you blend 2 tablespoons of grounded flax seeds with 6 tablespoons of water and allow it to sit for a little while until it thickens.
Which cocoa powder is best?
I use regular, unsweetened cocoa powder in the recipe, but if you like, you can also use Dutch-processed cocoa powder.
Can I add nuts to these brownies?
Certainly, you can add nuts. For added taste and texture, put 1/2 cup of coarsely chopped walnuts. For better results, chop the walnuts into pieces and put them in the oven at 350°F for about 8 minutes and mix it into the batter.
Can I make a double batch and bake it in a 9×13 pan?
Unfortunately, I didn’t put that to the test, but it should work as the brownies are fairly thin. If you double the recipe, increase the baking time by 10 minutes.
What is the best way to store the brownies?
Keep the brownies in a sealed container at room temperature for two days. If you want to store it longer, you can refrigerate it for up to a week.

Rich and Fudgy Gluten-Free Brownies
Course: DessertCuisine: AmericanDifficulty: Easy16
servings30
minutes1
hour190
kcalFudgy, rich and naturally gluten-free these brownies are a chocolate lover’s dream! Easy to make and delicious.
Ingredients
Gluten Free Brownies
1/4 cup (52g) unsalted butter, melted
1/4 cup (52g) vegetable or olive oil
1/2 cup (50g) regular unsweetened cocoa powder
3.5 oz dark chocolate, chopped
1 cup (200g) granulated sugar
1/4 cup (35g) tapioca flour
1/2 tsp kosher salt
3/4 cup (120g) semisweet or dark chocolate chips
2 large eggs, room temp
2 tsp vanilla extract
Directions
- Bring the oven temperature up to 350 degrees Fahrenheit. Using a spray, lubricate the 8 inch by 8 inch baking dish. Afterwards, cover both sides and the base of the baking dish with baking paper, but do not secure the top. Now cover the baking paper with a light non-stick spray and put aside the dish for now.
- Put your a saucepan over medium heat and place the butter inside. Once the butter has melted, mix in the oil and cocoa powder. Lastly, while stirring, let the saucepan sit for thirty seconds to allow it to bubble.
- After the saucepan is done bubbling, take it off the stove and mix in the chopped chocolate. Allow the mixture to cool for a few moments.
- In a mixing bowl, combine the sugar with the eggs and stir with a mixer until they are pale yellow and frothy. At a minimum, one minute is required, but more is encouraged.
- Add vanilla to the mixture and continue to stir in the butter and chocolate that cooled down. Stir until everything is smooth.
- Now add the salt as well as the tawaki powder and stir until everything is fully mixed.
- Mix in the chocolate chips until everything is incorporated.
- Pour the batter into the dish that was prepared previously, ensuring it is spread out evenly.
- Put it in the oven for 20-25 minutes. Afterwards, let the brownies sit at room temperature for 30 minutes before putting them in the refrigerator for an hour.
- Finally, when the brownies are ready, use the parchment paper to lift them out of the container. Using a large knife that has had the butter wiped onto it before each cut will ensure the edges are pristine. Cut the brownies into pieces and enjoy!
- You can use a knife to cut through the brownies to help release them from the parchment paper.
Notes
- For a lower sugar option, use a sugar substitute like erythritol.
- Store brownies in an airtight container for up to 6 days.
Nutrition Facts
16 servings per container
- Amount Per ServingCalories190
- % Daily Value *
- Total Fat
12g
16%
- Saturated Fat 6g 30%
- Cholesterol 25mg 9%
- Sodium 80mg 4%
- Total Carbohydrate
20g
8%
- Dietary Fiber 2g 8%
- Total Sugars 14g
* The % Daily Value tells you how much a nutrient in a serving of food contributes to a daily diet. 2,000 calories a day is used for general nutrition advice.
